Applicable models: CT4-LX
View the video here (it has no audio).
You can easily remove and replace a damaged or worn print head.
|
|
|
•
|
Do not connect or disconnect the power cord while your hands are wet. Doing so could cause an electric shock.
|
|
•
|
Disconnect the power cord from the AC outlet before you replace the print head.
|
|
•
|
Wear gloves before replacing the print head, to prevent damage to the print head.
|
|
View the video below for the procedure.
|
1.
|
Make sure that the product is powered off, and disconnect the power cord from the AC outlet.
|
|
2.
|
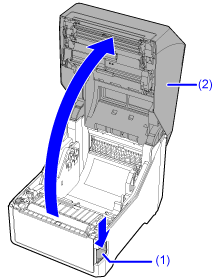
Press the cover open latch (1) to open the top cover (2).
|
|
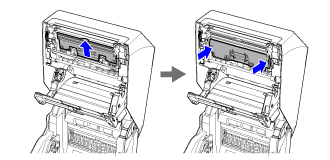
3.
|
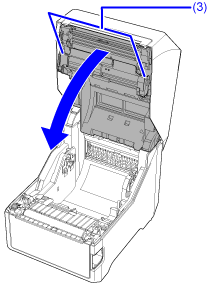
Pull out the parts (3), on which  are engraved. are engraved.
|
The parts (3) are indicated by the  (ribbon cover open) marks on the combined direct thermal/thermal transfer model.
|
4.
|
On the combined direct thermal/thermal transfer model, remove the ribbon if it is loaded.
|
|
5.
|
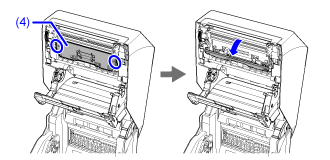
Put your fingers on the 2 tabs, on the left and right sides, on the head cover (4) and open it toward the front.
|
The head cover opens in 2 stages. Open it so the opening is about 45 degrees.
|
|
|
•
|
The print head and its surroundings are hot after printing. Wait until the product cools down.
|
|
•
|
Touching the edge of the print head with your bare hand could cause injury.
|
|
|
6.
|
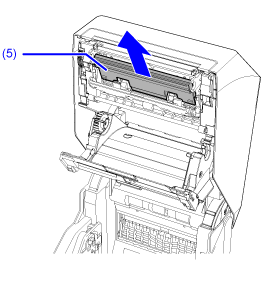
Take out the print head (5).
|
|
|
|
•
|
Do not touch the heating unit and terminals of the print head.
|
|
|
7.
|
Insert the new print head, tilt it upward, and close the head cover.
|
|
|
|
•
|
Handle the print head with care. Do not contaminate or scratch the sensitive print head surface.
|
|
|
8.
|
Load the ribbon back if you removed it in step 4.
|
Push both ends of the top cover, and close it firmly until it clicks.
|
|
|
•
|
When closing the top cover, be careful not to pinch your fingers.
|
|
Comments
0 comments
Please sign in to leave a comment.