Problem/Question
How to upload graphics
Applicable To
SATO All-In-One-Tool (AIOT)
Resolution/Answer
This function enables you to upload and save the graphics into the memory of a printer. It supports the following graphics formats:
|
•
|
BMP
|
|
•
|
JPG
|
|
•
|
GIF
|
|
•
|
PNG
|
The function supports the following types of uploading formats:
|
•
|
SATOGraphic: SATO graphics (ESC+GR/GI command)
|
|
•
|
BMP: Bitmap images (ESC+GT/GC command)
|
|
•
|
PCX: PCX images (ESC+PI/PY command)
|
|
•
|
Logo: Logo in internal flash (FD command)
|
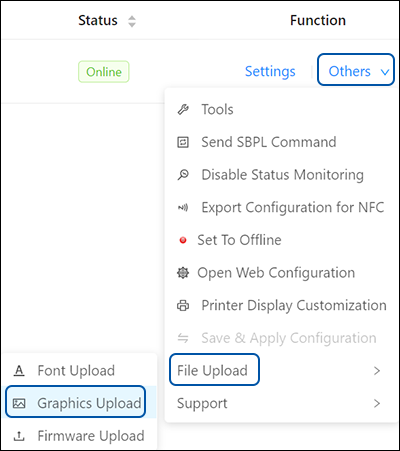
On the printer page, click [Others] > [File Upload] > [Graphics Upload] of the selected printer.

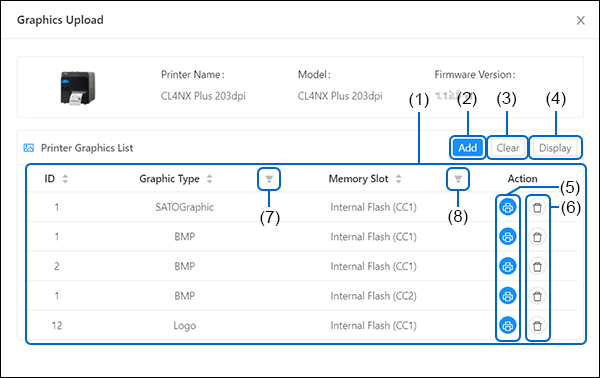
The [Graphics Upload] dialog is shown.

(1) [Printer Graphics List]
If there is any graphic installed in the printer, the graphics are shown in the [Printer Graphics List].
(2) [Add] button
Click this button to add graphics to the printer.
(3) [Refresh] button
Click this button to refresh the graphics list.
(4) [Clear] button
Click this button to delete all the graphics listed on the [Printer Graphics List].
(5) [Test Print] button
Click this button to perform a test print of the respective graphic.
(6) [Delete] button
Click this button to delete the respective graphic.
(7) Filter menu button
Click this button to filter the list by graphic type.
(8) Filter menu button
Click this button to filter the list by memory slot.
|
•
|
You can sort the graphics list by clicking [ID], [Graphic Type] or [Memory Slot] header.
|
Comments
0 comments
Please sign in to leave a comment.